Hi,
For those who missed out on my video learning program, I have just uploaded a video on "how to wind a bobbin" as a special gift for Mother's day. Please see the video at
http://www.youtube.com/watch?v=IS3l0oYEsPQ
If the above doesn't work just key in step-by-step-sewing videos on you tube and you will see the video on "How to wind a bobbin".
Look forward to your comments and feedback.
Until then,
Express yourself!!!
Jini
Tuesday, May 19, 2009
Wednesday, September 17, 2008
How to sew: 6 steps to choosing the right needle for sewing
The Needle
Your project and the fabric you purchase will determine the choice of a needle and thread. If you are sewing a project requiring batting or a project which requires heavier fabric the choice of your needle will be totally different than compared to when you are sewing a fabric or project which is medium weight or light weight. Although most of the patterns do not mention the needle and thread size, the following guideline will help you make a fair choice of a needle and thread for any project.
1) There are three types of needles
Sharp point for woven fabrics
Ball point needles for knit fabrics
And wedge point needles for leather and vinyl material
2) Delicate fabrics like silk and lace need size 9 needle of Sharp Point needles
3) If your fabric is Light weight for example Chiffon, Organdy, Crepe or Batiste then the Sharp point needle size would be 11/80 and thread size would be 60.
4) For medium weight fabrics such as muslin, wool crepe, linen, gingham, gabardine, flannel or corduroy use Sharp point needle of size 14/90 and thread of size 50.
5) For medium to heavy fabrics like bonded woven, canvas, coating, denim, duck, sailcloth, or for projects with batting use needle of size 16/100 and thread size 40 or heavy duty thread.
6) Knits such as jersey tricot, bonded or double knits you need to use Ball Point needles which are specifically designed for knits and are available in sizes from 9 to 18 the larger the needle size, the more "rounded" the needle point is. Ball point needles push between the fabric yarn rather than cutting through the fabric yarn.
Before starting any new project always use a new needle and be sure to use the same size and type of thread in the bobbin as the top thread. For most fabrics cotton wrapped polyester size 50, thread can be used. If in doubt ask the stores clerk when you purchase the fabric on the size of the needle to be used.
Express yourself
Jini Pinto
Thursday, September 11, 2008
How to sew: 7 tips on How to read a sewing pattern
Reading a Sewing pattern is easy if you know how. A pattern tells you the measurements for a particular size, where to cut, where to sew, fold, how to sew (zig zag or straight or slip stitch) additional embellishments and other instructions to make a beautiful project.
However, reading patterns are a task in itself. What I call them are Instructions written by experts for experts coz they presuppose you have sewing experience as much as they do and a language which they understand. Hence, it becomes imperative you understand the nuances of pattern reading and the below is aimed to help you get it started.
1) Find a project you like and based on your own experience. If you are new to the world of sewing go for patterns marked “Easy”. Next find the company that makes the pattern and the pattern number.
2) On the pattern envelop you will see the picture of the finished project. Observe the picture. This is how the project will look after you have finished sewing except of course the size which will depend on you. The size on patterns are different than ready-made garments hence you need to read the back of the pattern envelop to see the exact size you are looking for (which usually is given in different measurements for US and European sizes)
3) At the back of the pattern envelop you will see diagrams of the same project but in different styles or “views” as in if you are sewing a top then a picture of the top without sleeves would be one” view” or style, with half sleeves another “view” or full sleeves and so on forth to give you an idea as to the different projects you can sew with the same pattern. Also a little more detailed description of the back view of the project will be added.
The back of the pattern envelop will also mention the recommended fabric texture (heavy weight, sateen, organza), the minimum width of the fabric required for a particular size and the style or view you are sewing. It will also mention any extra fabric required in case if your fabric has “nap”.
Nap refers to the direction of the fabric and your fabric will have nap if it has one way print for example you are sewing a tea cozy and the print on the fabric is of tea pots then all the pattern pieces you cut should have the tea pots facing up and you may need extra fabric to ensure that. So is the case with stripes and plaids where you want them to fall symmetrical when you are finished with the project. In case of fabrics like velvet, corduroy and fleece you will notice if the fabric is brushed on one side it looks of a different color and brushed to another side there is a slight difference in the color this again may need you to buy extra fabric to avoid these differences.
Do not be afraid to reconfirm the width of the fabric with the store clerk to match the requirements of the pattern.
4) Inside the pattern envelop you will find Pattern pieces usually printed on large pieces of tissue paper for different views. Handle them carefully as they may easily tear. For some projects you may even find “master patterns” printed on sturdier white paper. Master patterns and other pattern pieces can be reused for different sizes by tracing the size you need on another tissue or pattern tracing material. This enables you to trace another style or cut the fabric according to a different size without losing the master pattern or the pattern pieces.
5) On the front page of the pattern, there will be an illustration or diagram of the front and back of the project. Directly under the front and back of the project diagram will be the diagram of each pattern piece marked with numbers. A List of the pieces according to the numbers will mention whether the pieces are for the front, back, loop or anything needed for the project.
Next you will notice the step by step sewing instructions to put the project together. Instructions with illustrations on how to layout the pattern pieces with fabric folds, batting if any, right sides together, lining, wrong side facing down, seam allowances etc will be described.
6) Cut the pattern pieces you need depending on the size you want. (If you want to reuse your pattern pieces you can trace the size you need on another tissue or pattern tracing material) Take care to cut along the proper lines for most the challenge in sewing is about cutting it right. Cut all the pattern pieces as illustrated and pin them to the fabric so it is similar to the diagram in the pattern. Transfer the circles, points, casing lines etc mentioned on the pattern onto the fabric with the help of a fabric marker. After you have cut the fabric according to the pieces, leave the pattern pieces pinned to the fabric until you need to sew them according to the instructions.
7) Glossary: Most patterns especially the easy ones have a glossary for new sewers to learn the sewing terminology and to make out the markings on the pattern pieces. In the beginning read and re-read a pattern for clarity. If in doubt you can look at the diagram or illustration to see if you are working in the right direction.
Reading a Sewing a pattern is like reading a map it seems difficult in the beginning but once you have done it few times over you will be able to follow the instructions. A little bit of practice and persistence and you will be a pro on sewing with the help of patterns. You can get more such information and tips to learn how to sew, free sewing patterns, instructions on how to sew a tea cozy, how to sew a sash, pageant sashes, headbands with ribbon bows, fabric jewelry pouch at www.step-by-step-sewing.com
Express yourself
Jini
Tuesday, July 29, 2008
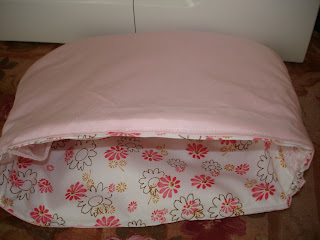
How to sew a tea cozy
Hi,


My husband and I love to read and what best place to spend the evening then at the bookstores. We usually ask for a tea pot with green tea. Green tea apparently is supposed to help metabolism. So as we were engrossed in our reading half an hour later our hot tea had turned into ice (ok okie cold) tea. I wished I was home so I could reheat it. Just adding hot water of course means losing flavor.
When we are at home it is easy I just use one of our tea cozies around the pot and not worry about the tea getting cold. So however, long my husband is on the phone or I am caught up with something else one thing we can count on is our tea remaining hot for a longer time.
Sewing a tea cozy is simple and I have sewn a few of my own. I have pictures of them below. If you plan to buy your own tea cozies are priced anywhere from $10 to $60 depending on the type you buy. Sewing your own tea cozy of course has it's own pleasure.
It is a great gift idea for something unique and handmade. There are many more patterns in my eBook and if you are a beginner or just looking for a refresher you will love the easy projects mentioned in the book. If you like more information, please do not hesitate to ask or check my website www.step-by-step-sewing.com.
Until then,
Express yourself,
Jini


Tuesday, July 22, 2008
Sewing machine for beginners: 5 Tips to consider before buying one
Buying a sewing machine especially when you are a beginner is a daunting task; add to that the brands and their different models it becomes much more difficult. There are five things to consider before parting away with your money for a sewing machine:
Purpose: Like with any other product, before buying a sewing machine you need to ask the purpose of why you need a sewing machine Jotting down the reasons why you need the machine may help you zero down to the one which is best suited for you.
Questions: As a beginner you may need to ask the following:
What is your budget? How much are you ready to pay for a sewing machine now?
Do you want to go for a simple sewing machine or a computerized one?
Will you be sewing simple home décor projects or fashionable clothing?
Will you be quilting?
What about embroidery? Will you need to embroider often?
Do you want a lighter and portable sewing machine?
Do you have enough space in your house or room for a sewing machine and consequently area?
Features: The minimum a beginner should look for in their sewing machine is
a very good straight stitch
a very good zigzag
simple method of making buttonholes
adjustable presser foot pressure
Stitch lengths from 0-6
Price: A good sewing machine starts as low as $60 for a very basic model, and can go up to thousands of dollars for the technologically advanced models. If you're a beginner stick to basic models rather than machines with loads of features, although if you're ambitious it's worth buying an all in one machine, so that you have the features as you become more experienced and familiar with them. Either way, consider all options and question yourself on what you're planning to use the machine for, and then choose accordingly.
The machine: There are a number of home sewing machine brands in the market, Singer, Brother, Juki, SewPro, Consew, Bernina, Simplicity, Viking Husqvarna and more. In the beginning, it is advisable to stick to a simple sewing machine like the Singer 4200 series or the Brother 25-Stitch Sewing Machine or Singer 30-Stitch Function Sewing Machine. If you are looking to buy for a child then the Singer Zigzag Sewing Machine and the Singer Chain Stitch Sewing machine is recommended.
For more information on learning to sew or step by step sewing instructions and guide to sewing a homecoming sash, a tea cozy and other accessories, visit http:/www.step-by-step-sewing.com. You will find advice and tips on sewing plus free patterns for learning to sew as a beginner.
Express yourself
Jini
Wednesday, July 9, 2008
How to sew a hem?
Hi,
Yesterday when I was ironing one of my pants I noticed the hem of one of it's leg was coming loose. I immediately set to work to sew the hem. Half way through I realized that may be I should have recorded it to share it with you guys, for one of our very common peeves is sewing the hem of our pants or adjusting the length of store bought pants.
Now I don't believe in reinventing the wheel, I saw on Youtube this short and comprehensive video on how to sew the hem of pants and hence sharing it with you. You can apply the same technique to any other sewing project you are doing. Measure, mark, fold, press, pin and sew and press again.
Please let me know if you are looking for any specific sewing techniques or ideas. If you would like to share something of your own you are most welcome.
Express yourself!
Jini
P.S. For many such "how to sew" techniques and ideas go to www.step-by-step-sewing.com
Monday, July 7, 2008
How to sew a button? Our first tryst with sewing starts here
Hi,
For most of us our first tryst with sewing starts with sewing a button. The button on our shirt, blouse, trouser or shorts. For many, this starts when we leave home when we have the unfortunate mishap of losing the "sewing professional" who all these years stitched our buttons and did any other minor repairs to our favorite dress or clothing.
Now when we are on our own, we have no choice but learn the art ourselves. Rather than giving up on the clothing altogether it definitely makes sense to sew a button or two. For those who are learning to sew I stumbled upon this video and just couldn't stop myself from sharing it with you all. This is a very simple way of sewing a button. Although there are many variations to it. This video is a great way to start!
Let me know what you think?
Express yourself!
Jini
P.S.Read more on sewing accessories, beauty pageant sashes and no sew projects on www.step-by-step-sewing.com
Subscribe to:
Posts (Atom)

